• Home
  • Equipment
  • Articles
  • Contact

  • Home
  • Equipment
  • Articles
  • Contact

Articles

Is the Neumann U87 worth the cost? 

Neumann's U87 is arguably the most recognizable and widely used microphone in the audio industry. It's a go to microphone for singers and voice actors, as well as overheads on a number of different sources. One of our favorite applications is when recording drums with the Glyn Johns micing setup where two U87s are used to capture an overall drum sound, complemented by a bass drum microphone.

But in our opinion the real value of a U87 is in its brand recognition. Prospective clients will regularly ask if our studio has one, sometimes even asking if ours is a "vintage" version but often end up preferring a different microphone. There are many alternatives at a much lower cost that often outperform it and some that go a step further and improve on the original design (for example, eliminating the 87's known tendency to accentuate sibilance.

Drop us a line if you're looking for suggestions, we've worked with a number of large capsule condenser microphones over the years and can guide you towards a better fit for your needs.

11/10/2021

  • Leave a comment
  • Share

Recording with Jecklin Disks 

Jecklin disks are one of our favorite stereo or binaural micing techniques. It creates a more natural stereo image by adding some amount of isolation between the two microphones being used. We're essentially simulating the dampening that a human head exerts on sound arriving to our ears.

There are a handful of companies selling discs, most notably Josephson Engineering's TN5. We've built our own in house with a 12" round piece of plywood and some acoustic foam. Not nearly as good as a TN5, but we've been very happy with the results.

We'll usually use a pair of Gefell M930s, which is a large diaphgram cardioid, when using a jecklin disc. We've also mixed mics, for example, when recording acoustic guitars and we wanted a "crispier" mic pointed at the neck. This is one of the fun things about jecklin discs: you get to experiment a really hear the differences between the two microphones.


10/07/2021

  • Leave a comment
  • Share

Flock Audio patchbays and noise 

We recently purchased a Flock audio patchbay for the studio and we love the agility and flexibility it provides. Unfortunately, one fairly important aspect of the product (to us, at least) is missing from Flock's marketing materials. 

The problem is that you can't really use it to manage preamp inputs. Meaning that this diagram taken from the manual is not actually a valid use case (mic -> flock -> pre input). Turns out that the signal levels between Flock and a preamp's inputs are widely mismatched and that connection results in a lot of buzzing. 

This is a problem because we were hoping to use the unit for auditioning different combinations of microphones and preamps on the fly. That's just not possible because of the resulting buzz. 

We exchanged messages with Flock's customer support and they stuck behind their marketing materials and even this manual diagram. But they also said the company will release a product in the future that will make this a possibility - we expect it will be something like Radial's mic switcher. Go figure. 

Still a great product but we are a bit disappointed with the misleading marketing here.

09/11/2021

  • 1 comment
  • Share

Audio patchbays 101 

Patchbays are one of the things that tend to separate a project or home studio from a commercial one. If you feel like you need one and the flexibility it allows, you probably already invested a non-negligible amount of money into your gear and you're moving forward. So.. congrats! Patchbays are awesome and fun to work with.

The convention is that the top row is where the outputs of your gear come out and the bottom row is where you input the signal into them. For example, the outputs of your mic preamps should be plugged into the top back row and the inputs of your digital converter into the bottom back row. Signal flow depends on how your patchbay is normalled. There are three modes:

  • full-normal means that the top and bottom rows are connected but that connection can be broken if a cable is plugged into one of the front jacks
  • half-normal means that the top and bottom rows are connected but plugging a cable into the bottom row breaks that connection and plugging one into the top row splits the signal (without breaking the connection)
  • non-normal means that the top and bottom rows are not connected and require front connections to be used.

The idea is that you can have default routing paths set automatically by using full or half normal modes but also be able to change them with patch cables and use different combinations of gear. Think of the previous example: preamp outputs would automatically go into converter inputs... except when something is plugged into the front !

Another important aspect is with regards to plugging microphones that need phantom power into a patchbay. Some manufacturers/models do allow for that and some don't. Be sure to check if yours does. There are some classic horror stories of those 48V hitting some innocent input when a patch cable is unplugged too eagerly. A good tip is to always be safe and turn phantom power off before unplugging the respective patch cable.

06/05/2019

  • Leave a comment
  • Share

Side chain processing 

A side chain is essentially a copy of the input signal used to modulate (or control) how a device operates. If a device does not have a side chain send/return option, that means it will either use a copy of the signal itself or that it will do some internal processing (to a copy of the input) in order to achieve whatever sound it's trying to achieve. It's important to note that it's always a copy of the signal, and not the input itself. This means that whatever happens to the side chain signal, it does not apply to the audio being processed.

side chain diagram
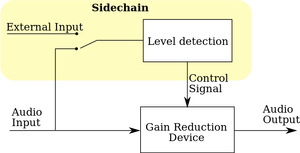
The most common use of side chain processing is with compressors. Due to how much energy low frequency sources have (like the bass drum on electronic music or a bass guitar in rock), these sources can very easily trigger a compressor even though the rest of the material in the input signal doesn't require compression. On those situations, adding a high pass filter to the side chain signal makes it so the compressor will be less sensitive (or completely ignore, depending on the filter) to low frequencies.

05/13/2019

  • Leave a comment
  • Share

What are polar patterns in audio ? 

Polar patterns are the shape of the area around a microphone's capsule where it will pick up audio.

There are five main shapes:

cardioid

 cardioid

omnidirectional

supercardioid

figure eight

hypercardioid

Most of the time, the polar pattern comes into play when trying to "aim" a microphone at a particular sound source while trying to avoid another. Most handheld microphones have a cardioid pattern for that reason: we want to pickup someone's voice and reject sound coming from the audience. Another great example is when recording orchestras or in a place with great acoustics, an omnidirectional microphone can be used to record both the music and the reverberation from the room.

There are several miking techniques that also require specific patterns or combinations of patterns. Some really interesting techniques for binaural sound (an attempt to mimic a 3D sound image) and stereo miking take advantage of the different polar patterns and allow us to achieve really amazing results. We'll cover those individually in future posts.

05/13/2019

  • Leave a comment
  • Share

Copyright © 2018-2022 stereoSAPIEN Recording Studio, all rights reserved

  • Log out
Powered by Bandzoogle